Disks, Shared Drives, ISO booting and Resizing
Everyday Tools
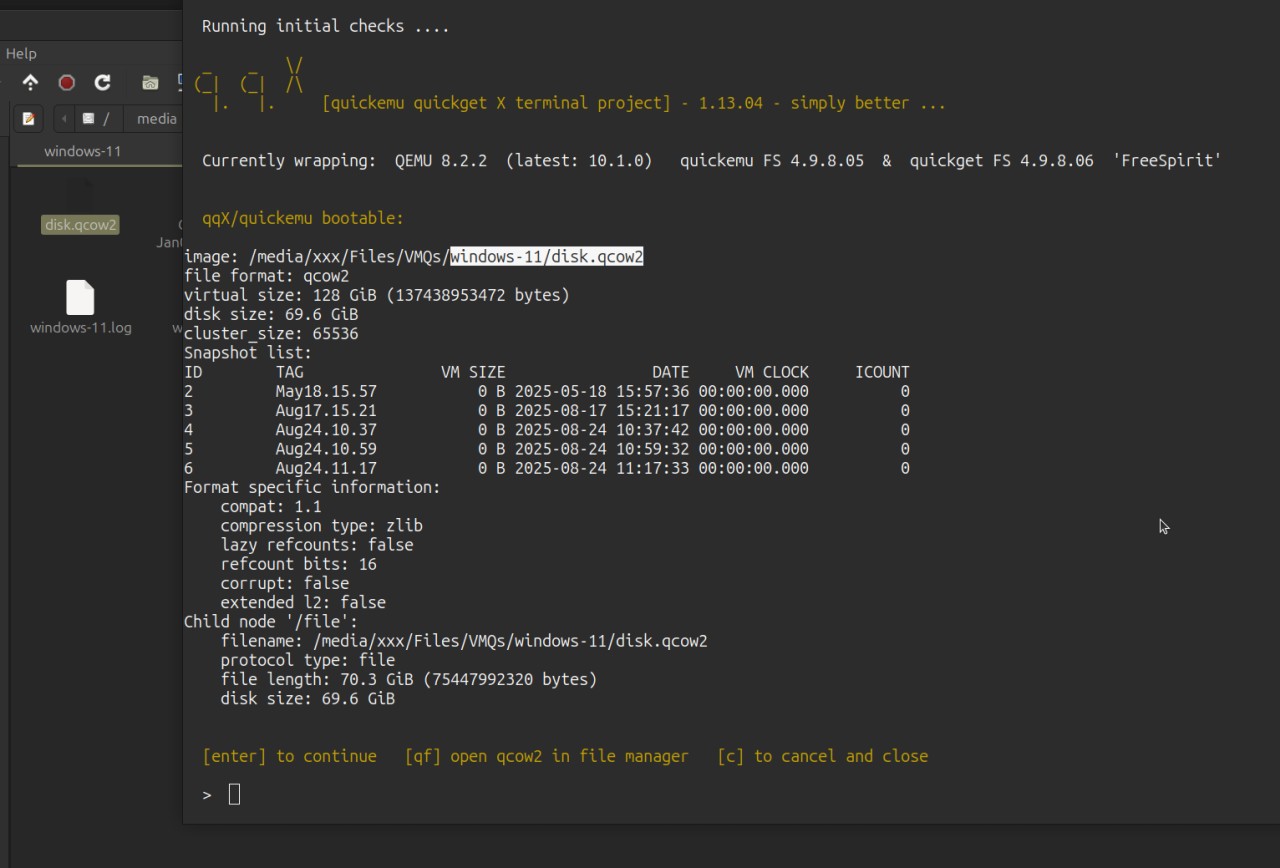
qqX will automatically run disk health checks in the background and alert you if there are problems.
You are also able to mount and view qcow2 virtual machine drives using the host's file manager
[qf] | [qqf] open a qcow2 drive in file manager [f] open VM folder
Click here to Google Auto-Translate these Screenshots
Right click to VIEW INSIDE any VM disk
SHARED and SECOND DRIVES
Access to sharing is connected to the display interface.
CURRENTLY THERE ARE TWO MAIN ACCESS AND DISPLAY METHODS: SDL and Spice
- SDL is much faster, crisper and generally to be preferred
The standard QUICKEMU METHOD for shared drives is via Spice:
-
Spice software has now become generally OUT OF DATE and unmaintained
-
The display tends to be rather blurry and the sharing has become unreliable
-
It is intended to be used with X11, not with Wayland which distros are now adopting ...
When it works, it allows a generally easy bi-directional access to the folder $HOME/Public
It also has a desktop to desktop copy/paste feature for text and for files, which can be useful
- For Linux guests, you should also install the
spice-vdagentpackage, from a terminal on the guest distro, via dnf, apt etc
See SPICE for software and more details, if needed.
Improved SDL methods
qqX takes things a stage further and allows you to create an further type of Shared Drive:
-
qqX drives work in all display modes
-
Open the [u] Utils menu:
[2c] create [2d] delete a second virtual hard-drive [3c] create [3m] unmount shared drive (guest boot)
-
qqX will auto-install the SHARED DRIVE parameters for you, in the general settings file, and will enable auto-mount.
-
Stage by stage help is given on screen but this link to the translation shared drive help screens may assist.
-
Copy and paste should further improve when SDL 3 works its way through into the display systems
SECOND DRIVES are installed in much the same way.
These are focused at individual distros, so qqX will generate auto-mounting via the .conf file.
-
A Second drive is a quick way to expand an individual VM's storage.
-
The .conf file entry may be copied to other distros, to extend further sharing capabilities.
BETWEEN DRIVE DATA TRANSFER
Either: Use the QF function to mount drives in a file manager, followed by simple copy and paste
Or: Start one of the distros, or specific distro, in Spice mode, and do similar
For Windows guests:
With qqX 1.12 and 1.13, the basic tools should normally have been installed via the automated unattended.iso
-
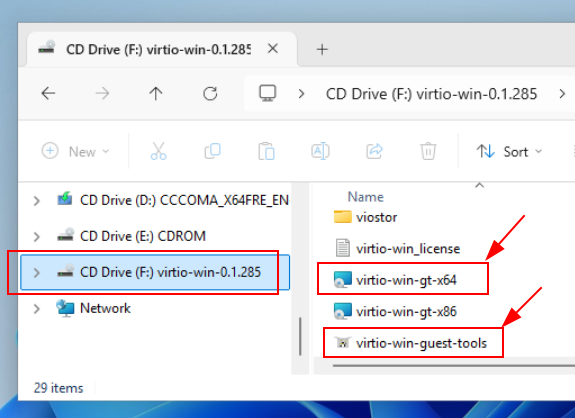
MAKE SURE to have followed up the installation by running
virtio-win-gt-x64.msiwhich is on the virtio ISO -
Use the additional Virtio guest tools, which are on the ISO and are better maintained than the Spice ones
From qqX 1.14 onwards, the needed drivers and agents will ALL auto-install and everthing should already be in place
RESIZING
Ideally the Virtual Machine should have been allocated a generous size from the outset. But things aren't always that way ...
Select the VM in the normal way and open the Utils menu [u]
Use the [disk] option to resize. Stage by stage help will be given.
-
See this link to the disk resize translation help screens, and others.
-
To mount Second drives, followed up by adjustments using Gparted from INSIDE the Linux VM.
Gparted will auto-detect the change in envelope size and auto offer to 'fix' things. KDE partition manager may not do this and will need the partition deleting in order to reach the new envelope size. This software is not always installed and may need to be added.
-
A workaround for KDE distros can be to copy the disks to a Gnome based distro VM folder, then mount them as Gnome second drives. Even a simple Live ISO is sufficient, as long as the .conf has the Drive added to it.
-
This workaround should function with main drives too, including Windows.
-
Or not. Sometimes only Windows will fix NTFS, even if Gparted has already done the main lifting. Windows has 'Check and repair' plus 'Defrag' and Trim functions that can fix things sometimes where others can't.
Partioning and formatting
For new disks, just like any new hard drive or disk, and just like when a distro is installed, we need to initialize things.
- If not present, you will need to install a partion table and will need to create and format at least one partition.
Older disks may already have been initialized.
Work on NON-bootable partions may be carried out from INSIDE a virtual machine, which makes mounting of drives easy.
Otherwise you will need to boot from an independent boot ISO.
-
Use Gparted, Gnome Disks, or similar
-
To create the partition table using Gparted, select 'Devices' from the top menu. Normally select GPT.
For WINDOWS VMs, the drive should be created as GPT and formatted as NTFS.
-
Set up NTFS drives using a Linux OS and Gparted but optimize (defrag) the disk using Windows
-
See resize notes for mounting workarounds
MAC OS, older than and including 10.13 Mojave 2018 might need a flag IN THE .CONF FILE to stop possible drive conflicts.
-
Quickemu code has the following MacOs note: "VirtIO Block Media doesn't work in High Sierra (at all) or the Mojave (Recovery Image)" Development tests with Mojave show both a Shared NTFS and a Second APFS to be working.
-
Thus, SET MacLegacyDrive as ="true" to load Second Drive (& not Shared) as 'ide-hd' instead of 'virtio-blk-pci'
The Shared Drive will always load as 'virtio-blk-pci'
BOOTING from ISO's
-
An in-menu ISO boot is now possible from version 1.9.03
-
And a space saving shared Boot ISO option is now possible from 1.11.05 onwards
-
See the [iso] utility from the main menu.
By pressing the 'esc' key during initial boot, you can access the Tiano boot manager and boot from any 'live boot' ISO, such as the one from https://gparted.org/download.php
ACCESS
If your drives only have root access, the following commands can help give general user permissions:
sudo chown $USER:$USER "mounted-drive-name"

chmod 775 "mounted-drive-name"
Gnome Disks has a neat 'take ownership' option:
Transferring virtual machines
A method of converting VMs from or to lib-virt based environments, such as Gnome Boxes or Virt-Manager, is still a work in progress which is hoped to be resolved.